


Virtual Memory for Sign Shops: Stop "Out of Memory" Mid-Job
Shop Floor / Workstation Setup
Large-format renders, dense nests, and bitmap-heavy vehicle wraps push Windows workstations past their RAM ceiling more than most other software ever will. Here's what virtual memory actually does in a production RIP or design workflow, and how to set it so a big job doesn't stall your queue.
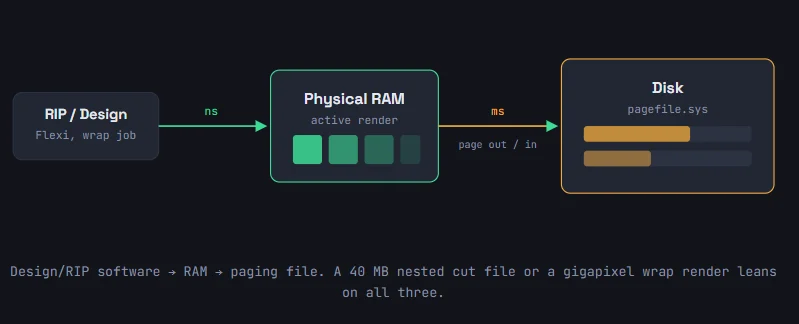
Design/RIP software → RAM → paging file. A 40 MB nested cut file or a gigapixel wrap render leans on all three.
Virtual memory is the address space Windows gives every running program so it can work as if it has more memory than the machine physically owns. Most of that space is backed by real RAM. Whatever's least active — a background print queue, a minimized layout you haven't touched in ten minutes — gets written out to a file on disk called pagefile.sys, freeing RAM for whatever's rendering right now.
The "virtual memory" setting in Windows doesn't add address space — that's fixed. What you're actually configuring is the size of the paging file: how much disk space Windows can borrow as overflow when a job outgrows RAM.
Why this matters on a sign shop workstation// where it bites
Most office software never touches physical RAM limits. Sign production does, routinely:
- Large-format bitmap renders — a full vehicle wrap or 20-foot banner rasterized at print resolution can run into gigabytes before it ever reaches the printer.
- Dense nests — packing hundreds of parts across a sheet for cutting or routing holds a lot of vector geometry and preview data in memory at once.
- Bitmap tracing and background removal — converting scanned artwork or photos into cut-ready vectors is memory-intensive by nature.
- Multiple jobs queued at once — a shop running print, cut, and design work in parallel on one machine stacks memory pressure fast.
When RAM runs out mid-render, you get the software equivalent of a stalled press: a frozen preview, a crash on export, or an "out of memory" dialog in the middle of a job that was due an hour ago. A correctly sized pagefile is what keeps that job finishing — slower, but finishing — instead of crashing outright.

How much to set// sizing for production machines
Windows sizes the pagefile off installed RAM automatically and does a reasonable job for general use. On a shop machine that regularly renders large files, these are better starting points:
| Installed RAM | Typical initial size | Typical maximum | Best fit |
|---|---|---|---|
| 8 GB | 8,192 MB | 16,384 MB | Small-format cut only, no RIP |
| 16 GB | 16,384 MB | 24,576 MB | Design + occasional print jobs |
| 32 GB | 16,384 MB | 32,768 MB | Daily RIP work, wraps, dense nests |
| 64 GB+ | 8,192 MB | 16,384–24,576 MB | High-volume production, multiple queued jobs |
If your shop runs frequent large-format or wrap jobs, err toward the higher end of these ranges rather than the low end — a paging file that's too small is what triggers a hard crash instead of a graceful, if slower, save.
Setting it manually// walkthrough
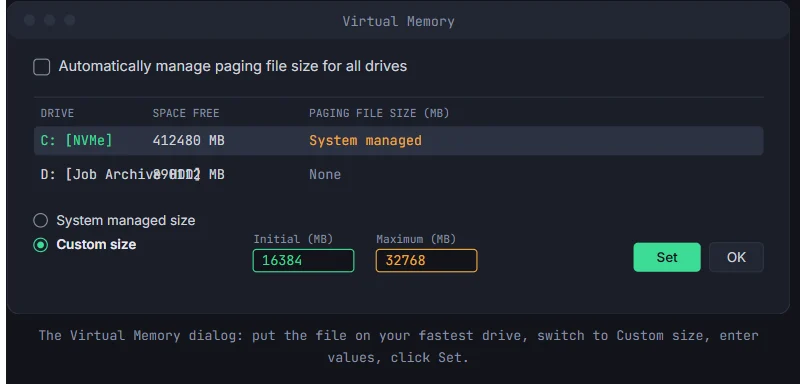
The Virtual Memory dialog: put the file on your fastest drive, switch to Custom size, enter values, click Set.
-
Open System Properties
Press
Win + R, typesysdm.cpl, and press Enter. (Or: Settings → System → About → Advanced system settings.) -
Go to Performance Settings
On the Advanced tab, click Settings under the Performance section.
-
Open Virtual Memory
In the Performance Options window, click the Advanced tab, then Change under Virtual memory.
-
Take manual control
Uncheck Automatically manage paging file size for all drives. This unlocks the per-drive controls below it.
-
Select the RIP/production drive and set a custom size
Click the drive your design and RIP software runs from — ideally your fastest SSD, not the archive drive holding finished job files. Choose Custom size, enter Initial and Maximum values in MB from the table above, and click Set.
-
Confirm and restart
Click OK through each window. Windows will prompt you to restart — the new paging file size takes effect after reboot. Do this before, not during, a production run.
A few practical notes for the shop
Keep the pagefile off the archive drive. If job files, print logs, or cut history live on a slower secondary drive, don't put the pagefile there — it belongs on the SSD your software actually runs from.
Setting Initial = Maximum pre-allocates the full file up front, which avoids the stutter Windows can introduce by growing the file mid-render — useful right before a big wrap or engraving job.
Check this after a RAM upgrade. Adding memory to a machine that's still on a manually-set, undersized pagefile won't help until the pagefile settings are revisited — either bump the values or switch back to system managed.
#pagefile.sys · #virtual memory · #production Windows workstations