


Should your shop need assistance due to damage from the hurricane, please reach out so we can see how we can help. Our community stands ready to assist.

 |
|---|
| Register now for discounted rate to ATSSA’s 2027 Convention & Traffic Expo |
Registration and housing are now open for ATSSA's 57th Annual Convention & Traffic Expo in Long Beach, Calif., Feb. 5-9, 2027.
Secure your hotel reservation through the official housing provider to unlock discounted registration rates and start planning your experience at the premier event for roadway safety infrastructure, innovation and technology.
From immersive education to the latest industry solutions on the show floor, ATSSA's Convention & Traffic Expo is where roadway safety and innovation meet.
The printing industry will converge on the North and Central Halls of the Las Vegas Convention Center September 23-25, bringing together more than 850 exhibitors, attendees from across the globe, hundreds of product launches, and every corner of the business — including commercial, apparel, wide-format, labels and packaging, mailing, textiles, and industrial printing. The goal is to send attendees home with what they need to make the right decisions right now — and into 2027. Read more here for a preview of what attendees can expect. [Credit: Josh Partee Architectural Photographer]
Learn about how SAi works behind the scenes...
Here is a great article on this question. What format do you think is best?
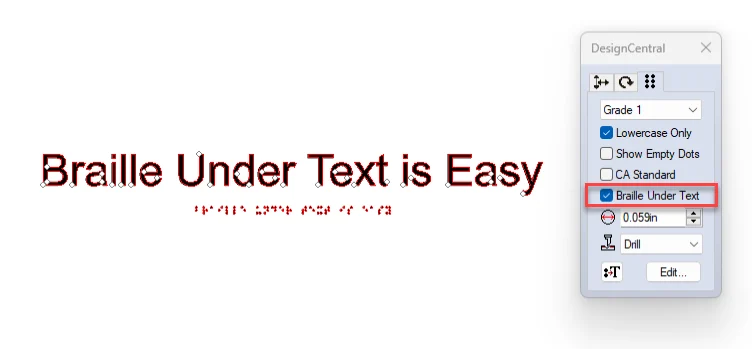
Did you know that there is a new Braille option that will place the braille and c3enter it under text for you?
Did you know that you can turn on a new option in production manager that will examine your print and if the resolution is too low give, you the option to resample?
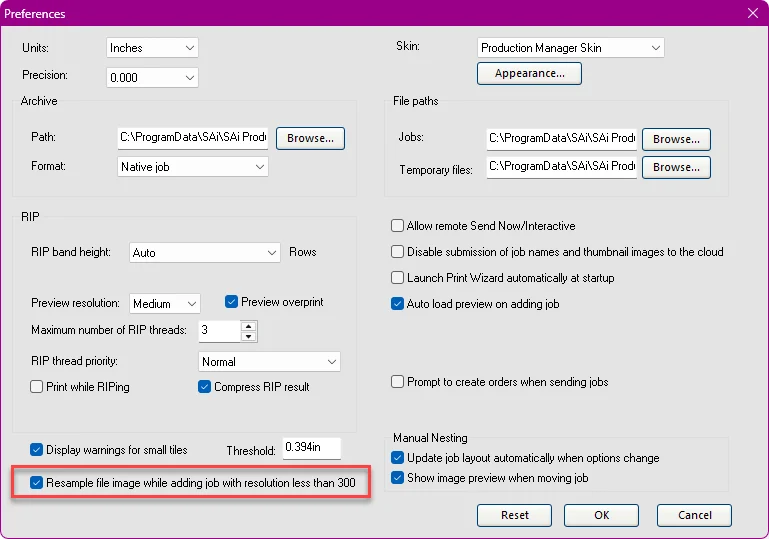
It is NOT on by default. In production Manager, you will need to go to the Edit menu and choose preferences, then turn it on as shown above.
Every year, thousands of sign and print professionals fly into Las Vegas for PRINTING United, walk the floor, see the new machines, collect the swag — and fly home without ever touching the one thing that actually determines whether all that new hardware pays for itself: their software workflow.
This year, we're giving you a better option.
A Live, One-Day Flexi Complete Class — While You're Already in Vegas
On September 22, 2026, from 8:30 AM to 4:30 PM, we're running a full-day, in-person Flexi Complete seminar in Las Vegas — timed for the PRINTING United crowd who'd rather turn a trade show trip into a real skills upgrade. No webcam, no muted mic, no "I'll rewatch the recording later" — just a room full of shop owners and operators working through Flexi side by side with an instructor who lives in this software every day.
Leading the class is Mark Rugen, who most of you already know from the Adendo and SAi community. He's not reading slides — he's showing you the exact workflows, shortcuts, and troubleshooting moves that separate shops that fight Flexi from shops that fly through it.
What You'll Actually Walk Out Knowing
This isn't a beginner's overview. The day is built around the features that quietly eat the most time — and cause the most costly mistakes — on a real production floor:
- The Top 5 Essential Features of Flexi — DesignCentral and DesignEditor, working with layers, setting up Contour and PerfCuts, soft-proofing for easy color management, and the shortcut keys that save you hours over a year
- Vectorizing tricky images — what to do when auto-trace just isn't cutting it
- Bitmap workflows that actually hold up — removing complex backgrounds, understanding how embedded profiles affect your color output, and fixing resolution problems before they become customer complaints
- Production Manager, unlocked — white ink handling, building your own presets, examining ICC profiles, and nesting jobs to stop wasting material
- Flexi and Adobe, working together instead of fighting each other
- Where to go next — getting support, the SAi Community, and the path to Flexi Academy certification
Coffee's at 8:30. Lunch is included. By 4:30, you'll have a full day of hands-on reps under your belt — not just notes.
Seats Are Limited, and the Price Goes Up
This is a small, in-person seminar — not a webinar with a thousand tabs open — so seating is capped. Register before September 8, 2026 and it's $149 per seat. After that, it's $199.
If you're already booking flights and hotels for PRINTING United, this is the easiest add-on decision you'll make all year: one extra day, one room full of people who run shops just like yours, and a Flexi skillset that pays for itself on the very next job you run.
This is a repost by permission from Phil Keenan - Veurve Colour originally in the Roland Digital Printer Support Group, but it has good info for any printer.
It's rather pertinent that a post comes up this week with a member looking to replace an aging printer right as I've found some reference images for a customer that was asking also. So here is some info on that...
For just about every machine on the planet there is a graph that represents its effective life. The 'Bathtub Curve' gains its name from the shape that the graph makes when you take into account different types of potential failure over time. We have Early Failures which usually fall inside the warranty period and taper off, a steady background of 'normal' failures, and then failures due to wear and tear which really ramp up as time goes by.
How long each of these periods are depends on the specific engineering/technology and its limitations, but the theory is still much the same. In terms of reliable commercial inkjet printers like most of the Roland R2R family then the useful life sits between 8-10 years. After this point you are putting your livelihood in the hands of Lady Luck.
Roland will normally carry most critical parts beyond 8 years, so for a printing business it makes sense to budget for this timeframe when planning for their next capital purchase. At this point write down the value of the printer to zero. In reality by then the printer should have returned you many times its value in profit, so let it go cheaply to the next person as they have a much higher risk from their purchase than did you. Anyone purchasing at this time needs to understand that they are buying a gambling machine. Some will win, some will not. If you've gone 8 years and not made a multiple of at least 5 times the value of the printer back then you have to assess if you want to keep owning one or outsource and let someone else deal with the costs of ownership.
I've attached an image of the bathtub curve (thanks to an unconfirmed LinkedIn source). I've also attached a photo of the manufacturing date sticker you will find on your Roland printer. The format is YYYYMMDD. We are in 2025, and if your printer has a number starting with anything lower than 2017 then you are already past the best life and really should start considering the next machine. It can be a good time to keep the old reliable for a little while during your transition phase.

The diagram Above is of unknown origin.
